Mixed Tour 1 2016
Videos are available on the YouTube channel


Videos are available on the YouTube channel
Danny Karlinsky #23 has the disc for Sockeye against Revolver in the Final of USAU Nationals 2015;
In the short video below, we break down what exactly happens in the six seconds leading up to the throw (audio at the end):
You can watch “Crazy” Frank Huguenard and Felix Shardlow’s full analysis of the USAU Nationals 2015 Final here – also check out the discussion on reddit.
We’re all familiar with the following situation; our team has turned over, the player we’re marking is walking to the disc, we’re putting a force on, and our sideline helpfully advises “No breaks!”
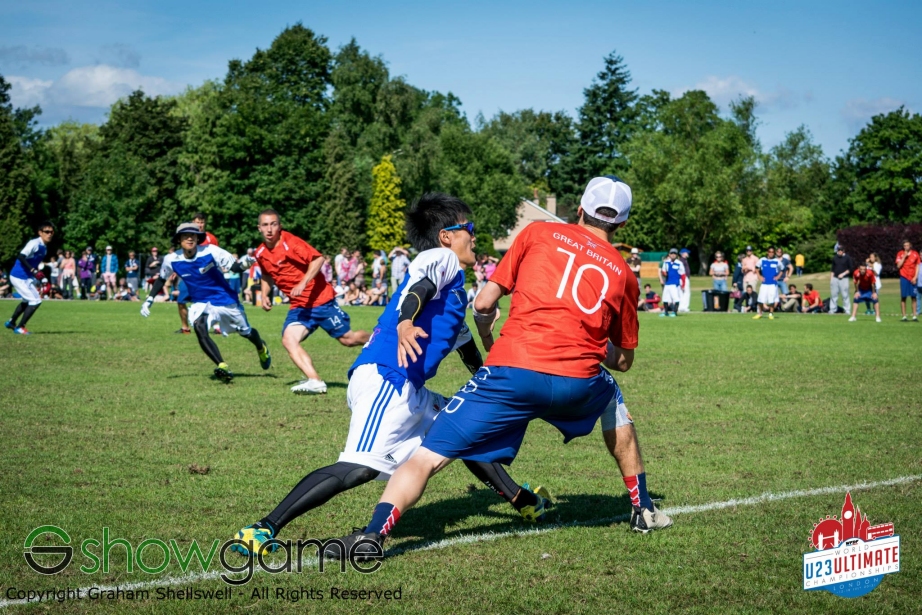
Photo by Graham Shellswell from The ShowGame
At this moment in time, not being broken is pretty much your only aim. If there was one thing you were planning on avoiding for the next few seconds, it’d be being broken by the thrower. You know this is not an easy task, but you’re going to try your hardest. You’re remembering the release points of your mark, you’re glancing over your shoulder to visualise the potential threats, and you have an extra pair of eyes on the sideline to help you. What do they say? No breaks. Guess you’re to blame if you get broken then – the instructions couldn’t be clearer.
Another situation we’re all familiar with – the opponents break the force, and the shout of “No breaks!” rings out again – usually in a more whiney tone. The force has already been broken – all the shouter is doing is releasing their frustration in a commonly acceptable way. You wouldn’t shout “Don’t get scored on!” before or after the opponents score, would you? Everybody knows what you were trying to do, and that you didn’t succeed in doing it – no need to state the obvious.
The real fallacy of ‘No Breaks’ isn’t in how obvious, unhelpful, or useless it is as a hindsight, but in the near-impossibility of the request. When two players of comparable ability face up against each other, the thrower will be able to break the force. We’ve all been part of drills since we were beginners where breaking the force is a given. The three-man break-force drill doesn’t pose any real challenge to the throwers – without any restrictions on time and space, breaking the force is easy, and stopping all break throws is incredibly difficult.

The sideline have access to far more information. They can see space developing behind the force, and instruct the mark to move to prevent throws to this space. Conversely, they can also see where covered cuts or crowded areas are behind the force, and instruct the mark to force throws to go towards these areas. Sideline players can identify a free offence player cutting and provide very timely shouts to help the force prevent the ‘easy’ throws to them.

Photo by Christine Rushworth from The ShowGame
Most higher level teams have their own lexicon for communicating some of this information – ‘left hand / right hand‘, ‘around / inside’, ‘strike‘ and ‘spoil‘ / ‘no huck’ calls are quite common, and each are useful for encouraging the force to concentrate on taking out a particular throw at a particular time – infinitely more useful than a ‘no break’ shout. This allows the force to direct their efforts in the most effective way.
The sideline can also help the force by letting them know more general / less situation-specific information, so as what the thrower’s preferred throws are – if they’ve been using high releases to devastating effect, then communicating ‘high hands‘ can benefit the defence. If the thrower is going into the wind, then ‘low hands’ can force higher release points, therefore tougher upwind throws.
At the next opportunity when your team mate is stepping up to put a force on, trust that they know the basics of the task at hand, and communicate to them using the info they can’t see or hear for themselves. It’s time we heard the last of “No Breaks”.
In this article I will be seeing how a selection of common offences match up to a selection of common defences in Ultimate, and whether any conclusions can be drawn about the most effective offences / defences for teams to spend time learning in order to efficiently counter their opponents’. When planning what strategies your team should learn in any given season, it’s important to know what their strengths and weaknesses are, and how they are most likely to be countered effectively by your opponents.
The strategies listed are by no means exhaustive – every strategy has several different ways of being played, several tweaks or modifications, several patterns or plays which can be employed – none of which are touched on here, for the sake of simplicity. Environmental factors are not considered, “match-strategy” is not considered (e.g. come out more aggressive at the start of a match; change your defence regularly), skill-sets of teams or individual players are not considered, and different teams will have experienced different levels of success with the strategies listed – these estimates and statements are generalisations, made in order to achieve some kind of tangible comparison between the offensive/defensive strategies based on their merits and drawbacks.
I’m working with four offences and four defences:
Vertical / side / split stack offence: Players line up in the centre or at the side of the field, and make hard ‘cuts’ to the space available, before ‘clearing’ back into a stack. One player stays behind the disc as a dump/reset.
Horizontal stack: Players create a 3-4 formation (3 backfield, 4 downfield), with the downfield players either cutting towards or away from the disc.
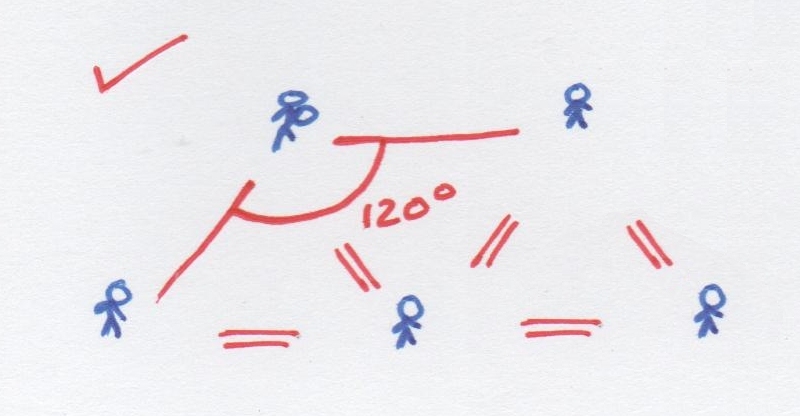
Hexagon offence: Players form a hexagon made from equilateral triangles, often in a 2-3-2 formation, with movement creating space for passes in any direction. More info on Hex offence here.
Zone O: Varies from team to team, but usually 3 or 4 players in the backfield, who swing the disc from side to side, looking to pass downfield to ‘poppers’ attacking the space in front of the disc, and wings or deeps further downfield.
Strict person-D: Each defender marks an offensive player, staying very close to them for the duration of the offence. The side the defender tries to hold position on their mark is determined by the direction of the force put on the thrower.
“Help-defence”: A modification of person-D where the defenders are heads-up to switching marks and helping covering dangerous space when appropriate. More info on Help-defence here.
Flexagon: A hybrid defence, taking elements from person-D and Zone, to apply pressure to all players by using constant teamwork and communication. In theory a 2-3-2 setup, but actual positioning is entirely dependant upon where the offensive players are. More info on Flexagon D here.
Zone D: Defenders spread over the field to cover the space, usually overloading the area in front of the thrower to limit short downfield throwing options. There are many types of Zone D, this article does not distinguishing between them (for simplicity).
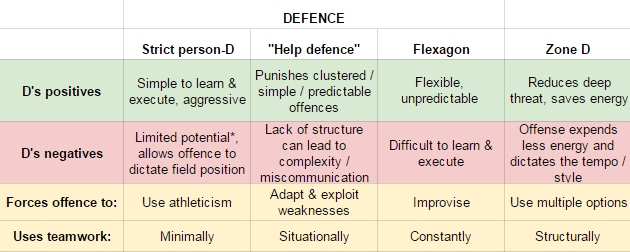

The table below compares each offence against each defence. The numbers are scoring likelihood / defence likelihood estimates, assuming two high-to-elite level teams are competing with well-practiced offences vs well-practiced defences. For example, assume the (very common) combination of Vertical stack vs strict person-D would see the offence scoring without turning over 85% of the time – use this as calibration for the other numbers, whether or not you agree with the figure! This is roughly the same for Horizontal stack vs person-D, and for Zone O vs Zone D – these combinations are generally considered comparable with each other in terms of effectiveness, as they are the most commonly played.
“Help-defence” is more variable than the others, as it depends a lot on how well it is played by the defence, and how well the offence adapts – so I’ve given the numbers a range.
Hexagon and Flexagon are quite new strategies, so the estimates are more likely to be inaccurate, however they are taken from 2-3 years of regularly teaching and playing the strategies – including with the GB U23 Mixed 2015 team.
All the numbers are rough estimates of likelihood, and the relative effectiveness of each strategy will certainly vary from team to team, and depending on how each is played!

vs Strict person-D, it’s best to get defenders clumping together (covering the least / most useless space), so a vertical or side stack is ideal, and horizontal creates a large deep space. Hex spreads the defenders out, meaning the D actually becomes more efficient.
vs “Help-defence”, defenders who are clumping together will be able to poach/switch to help each other, so vertical stack becomes less effective. Horizontal spreads the defenders well, making it hard for them to help each other effectively – especially when it comes to covering the immediate deep threat. Hex spreads the defenders further and punishes poaching more efficiently, but doesn’t offer the immediate deep threat of Horizontal.
vs Flexagon, vertical stack is negated, and Zone O doesn’t function well due to the tight marking against static players. Any set cutting patterns of plays are unlikely to work, so Horizontal stack and Hexagon must improvise in order to function. Improvisation is easiest done when the number of available options is maximised, so Hex is the ideal setup.
vs Zone D, stack offences are negated. Zone O and Hex have both been shown to be effective at breaking down area-based (zonal) defences, so should be played to counter Zone D.
vs Vertical / Side / Split stack offences, the offensive players are clumping, so strict person-D plays to their strength (clumping your defenders together and leaving large open spaces), whilst Zone or Flex will force them to transition into another offence. Help-defence punishes the clumping, which encourages the offence to improvise, and can generate turnovers when played well.
vs Horizontal stack, the offence is more spread, so help-defence is harder to implement. Strict person-D is moderately effective as usual (depending on your athleticism vs theirs), but Zone D or Flexagon will force the offence out of any pattern- or play-based movement.
vs Hexagon, simple person-D can cause issues, specifically if you are more athletic than your opponents. Help-defence is easier punished by Hex than other offences, but can force the offence to use all their options. Traditional zones don’t change the formation of the Hex, but can force a different play-style which the offence may not be used to. Flexagon applies pressure to the highest number of options, forcing the offence to improvise – meaning any set patterns or plays become unreliable, and players must identify space for cuts and passes as and when they appear.
vs Zone-O, the offensive players are looking for space to occupy, so person-D will force a transition. Zone D conserves the energy of most defenders, however Zone O will be well-practiced against Zone D. Flexagon is more person-focussed, which forces Zone O either to transition or to improvise – to play at a different pace/tempo than they are used to in Zone O.
From an offence point of view: The most common defence is strict person-D, and the most common offence – vertical stack – does well to exploit strict person-D’s weaknesses. If the defence start switching and poaching (“Help-defence”), then the offence must start to improvise, and would ideally be able to counter with a practiced Horizontal stack or Hexagon offence. If facing Flexagon, offensive improvisation from a Horizontal / Hex / Zone O setup is necessary. If the defence play Zone, then the offence must respond with a practiced Zone O or Hexagon offence.
From a defence point of view: The most common offence is vertical stack, which plays to the weaknesses of strict person-D. Playing Flexagon or a Zone D will force the offence to transition – and you will see if they have a practiced alternative. Zone O can be countered effectively with person-D or Flexagon, which forces the offence to either completely improvise, or to play Horizontal stack or Hexagon offence. Flexagon still functions well against these offences, as does person-D – providing there is no athletic disadvantage.
From an offence point of view: Time spent perfecting a vertical stack offence can be made to be ineffective if a defence plays anything other than strict person-D. Training an offence which works against Zone (i.e. Zone O or Hexagon offence) is essential. If your opponents have good “Help-defence” or Flexagon D, then you must either be able to improvise, or transition to Horizontal / Hexagon in order to keep your scoring percentages up. Horizontal must transition when facing Zone, but Hexagon can be played effectively against any defence you face – even though it may not necessarily be the most effective against any defence individually. Your team can function against any defence if they know both Horizontal (with improvisation) and Zone O, or if they simply know Hexagon offence. To be the most effective, a team should also learn an offence which punishes strict person-D more efficiently – vertical- or side-stack.
From a defence point of view: Strict person defence is simple to learn and functions against any offence, but its success is determined by the athletic edge you have over the opponent, and limited by the lack of teamwork involved. If you have an athletic edge over almost every opponent then strict person-D can get enough turns to win games, but only until you reach an athletically superior team playing a well-practiced offence, or until your own offence is countered. Learning a more challenging defence, particularly one which counters the most common offence – vertical stack – is essential, unless you are fully relying on your athleticism or your offence.
“Help-defence” is hard to learn and implement due to its lack of structure and principles, and it is most useful against vertical stack – less so against Horizontal or Hex. Zone D completely counters vertical and other stack offences, however most teams have a well practiced Zone O which will counter it well. Although Flexagon is also hard to learn, it is flexible enough to be played effectively against any offence you face, countering the most common vertical stack and Zone offences effectively.
More info on Hex offence here.
More info on Help-defence here.
More info on Flexagon D here.
Video of Flexagon D in action.
updated 03/10/2018 | old version available in French / en Français
Hex is a new offence which most of your team will not have seen or played before – introducing it can be both fun and exciting, but will certainly come with its challenges. I’ve had experience introducing the offence to a variety of teams and players, from primary schools through University level teams, at Hex Clinics and GB U23s, and along the way have learned plenty about how to make the introduction as enjoyable and productive as possible. I hope to share some of what I’ve learnt with you in this article.
If your team are already committed to learning Hex, you can arrange for a Hex Clinic to be run in your city – this includes a classroom session to go over the Hex documentation, video examples, shape & movement theory aspects of the offence, and immediate analysis of footage from the training. This will set your whole team up for playing the offence. Details on running a Hex Clinic in your city follow later in this article.
If a Hex Clinic is not an option and you are just running a session or two with your team, then first send out some links to hex material in preparation – even if only a few read them, it will help the session go a little smoother.
There are three main elements you should teach, all of which are different to stack offences:
Instead of boring your team with lots of explanation, it’s best to get them active as soon as possible – so teach everything through exercises and games, and it’s a good idea to first work on Technique. This also highlights to your team that the offence is not simply a new formation, but a new style of play. All of the exercises & drills below can likely be improved on or done in a way which better suits your team – there is plenty of room for development of coaching hex offence!
The main techniques to learn which are suited to hex: adopting the neutral stance / power stance, and the throw-and-run. Neutral stance can be encouraged with a quick focused throwaround, and should be mentioned throughout the session when you notice any player isn’t adopting it. Throw-and-run can be practiced as follows:
Technique practice – in pairs, practice throw-and-run footwork – lifting the non-pivot foot knee high before accelerating out of throws, backhand/flick/off-hand. One person does five back-and-forth reps and then switches.
Technique exercise – Dribble Slalom Race (can be run with lines of 4-5 people):
Technique drill – Brilliance Box Drill:
Other drills such as the give-go-swill drill (detailed below) can bring in a defender whilst also working on technique, good to run if you have more time/trainings with the team.
Plenty of scope here for coming up with your own drill which encourages players to follow the Hex Movement Decision Tree. If very limited for time this stage can be skipped, however a good round of Keepdisc is good to warm up hex-like movement;
Keepdisc
8-16 players
Focus: Sustainable possession
Mark out a box which is quite spacious – half a pitch (including end zone) is good for 7v7 – and split players equally into two teams. The aim of the exercise is for the offence to keep possession for as long as possible, playing out of the Hex setup/shape. Possession switches on a turnover as usual, fouls and all other rules are as normal. You can score the drill by number of sequential passes each offence completes, or which team is in possession after X seconds – the former encourages taking the open pass more, the latter encourages safer possession.
Keepdisc is tough physical work and it trains sustainable possession – players must be efficient with movements or they will get too tired. It also gets players practicing fundamentals of the offence such as not surrounding the disc (this is the most common cause of turnovers in keepdisc), staying connected without crowding, & taking the open pass.
If you wish to expand on Keepdisc, consider:
– changing the play / break times
– adding an extra defender every 10-20 seconds
– adding 3 or 4 end zones of different colours around the edges of the box, after X seconds of possession then the whistle blower announces a colour – if the offence then score in the corresponding end zone, they get 2 points.
Learning the shape will be hard for some players due to a fundamental difference between hex and stack offences – in stacks, the formations are understood relative to the field of play, whereas in hex the shape is understood relative to the disc. The hex shape remains the same and rotates depending upon where the disc is on the field. It’s best to avoid attempting to simplify it to formation terms, such as ‘2-3-2’ or ‘1-2-1-2-1′, as this is like trying to fit a square peg into a round hole and will hinder players’ understanding of how the shape works.

Shape Race – two teams of 7, throw two discs out onto the field and the two teams race to get their hex shape set up correctly. Teams should not communicate ‘positions’ in down-time, instead plenty of communication should be done within the teams whilst moving to set up & adjust the shape. If in doubt, make an equilateral triangle with two teammates.
Get a game going without much more discussion. Call a ‘pull catcher’ on the line, everyone else sets up shape relative to that player – so be aware of whether they are near the sideline or the middle of the field, as this affects the positioning significantly. Avoid calling positions on the line as this takes away a shape-learning element, and may discourage players from free movement around the field. Whilst the game is going, you can blow a whistle when the shape gets deformed and flow has stopped (stall gets above 3) – players freeze,look at their positioning,
and then set up their shape correctly before continuing.
Some common scenarios which occur:
Over-rotation – a player gets trapped against the sideline, and they cannot find the solution. Caused by too many players pushing downfield, distorting the shape. Solution: communicate – rotate the shape.
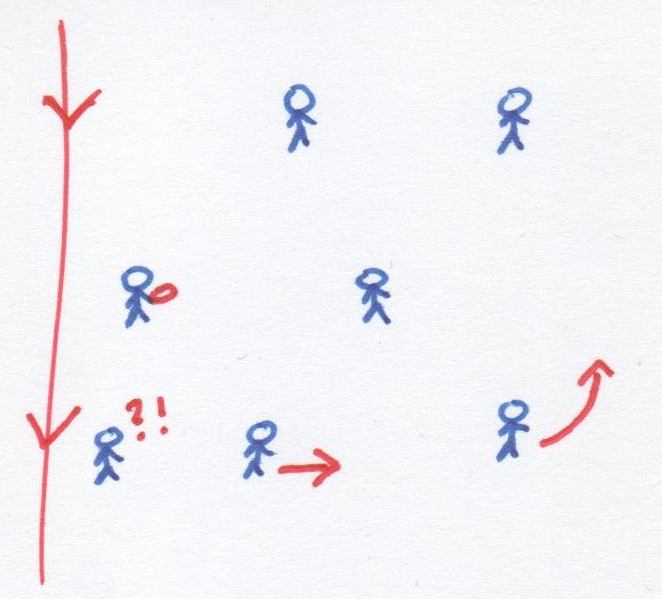
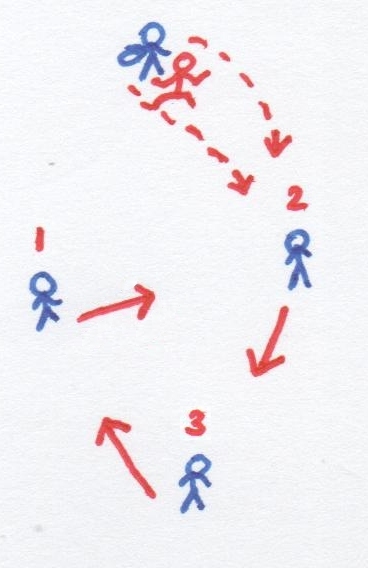
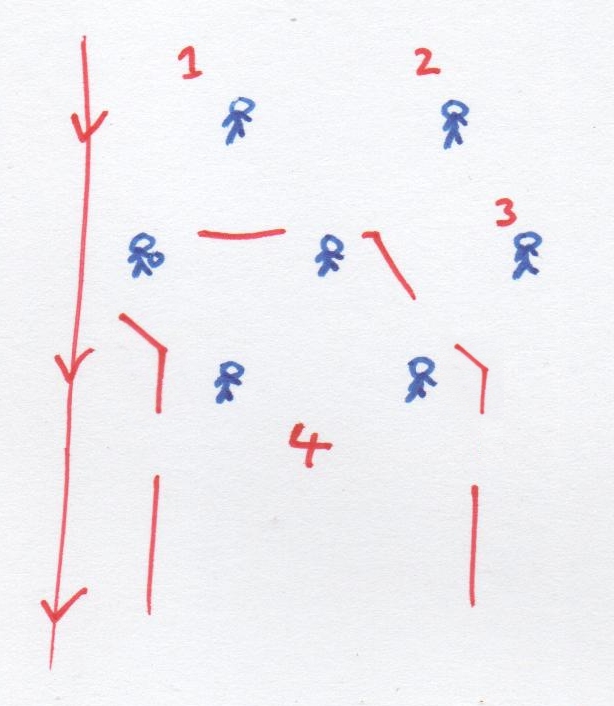 When you pass forward and to the line from a back position, you are already in a good position so don’t need to ‘clear’ downfield unless you know connected players wish to replace you. Many players have a habit of doing this, which can leave the ‘back’ positions vacant when the disc is on the sideline.
In the diagram on the left, positions 1 / 2 / 3 are important for sustaining possession and initiating flow, however most players will gravitate to area 4 out of habit, or out of an over-desire to score.
One way of fixing this flow-breaking problem is to use a whistle to stop the game when the disc is on the sideline, and check with the players how many of the back / far wing positions are occupied or vacant, and how long it takes them to move to occupy them. When they are occupied it should be clear how many more options are available to both the thrower and the cutters.

If you have done a few Hex trainings and would like to progress your team’s development, a live-streamed analysis session is ideal. The only requirement is good footage of your team training or playing Hex. A live-streamed analysis session involves your team following a YouTube link at a specific time/day, and joining Felix live as he goes through pre-recorded footage of your team playing and provides strategic, tactical, and technical analysis, with focus on particular areas the captain/coaches want to look at. Your team (of any number) can chat to each other, interact, and ask Felix questions in real-time via the Live Chat window. If this is still unclear, check out this example recording of a live streamed analysis session with Outbreak Mountain from Australia. There are a number of different Live-Streamed Analysis Session packages available depending on the needs of your team – get in touch with Felix for more details.

If you would like to kick-start Hex in your club then you should arrange a Hex Clinic for your city. This is the best way for your whole team to get on the same page with adopting Hex Offence (and Flex Defence, if you choose the full-weekend option). It includes classroom (theory) sessions, practical sessions, and footage analysis sessions immediately after training – if you choose to invest in that option. Get in touch with Felix for more details and a quote!

Another method of teaching Hex which has also been experimented with is the Play Progression Method. This involves less talking and more playing, so it’s particularly useful on cold days, or with teams who are receptive to going outside their comfort zone to try something new without it really being explained. After a warm up, go immediately into Ultimate games, giving the players small focus points between each round:
2v2: Take the open pass. Players should take the open lateral pass whenever the defenders allow it, which will mean they will often be level with each other, rather than one thrower back and one cutter downfield. When а defender takes the lateral pass away, there is plenty of space for a lead pass downfield. As opposed to a cutter trying to get free of their mark downfield for a pass, the type of movement you want to encourage looks more like this:
Brighton City (White) penetrating, vs Brighton Legends (Black) at Regionals 2015.
3v3: Stay connected without crowding – demonstrate what you mean by ‘connected’ (see ‘Explanation’ section on positions), and how it follows that a triangle setup is appropriate from a static disc. Demonstrate staying connected dynamically – if the other cutter cuts away from you, you should move towards them to stay connected, whereas if they cut towards/across you, you should either move away from them or towards where they came from, to avoid crowding.
 4v4: Make equilateral triangles – demonstrate the two possible shapes from a static disc, one where the thrower is part of two triangles, and another where the second triangle is further from the thrower, created by the downfield players. If in doubt, find two players and make an equilateral triangle with them.
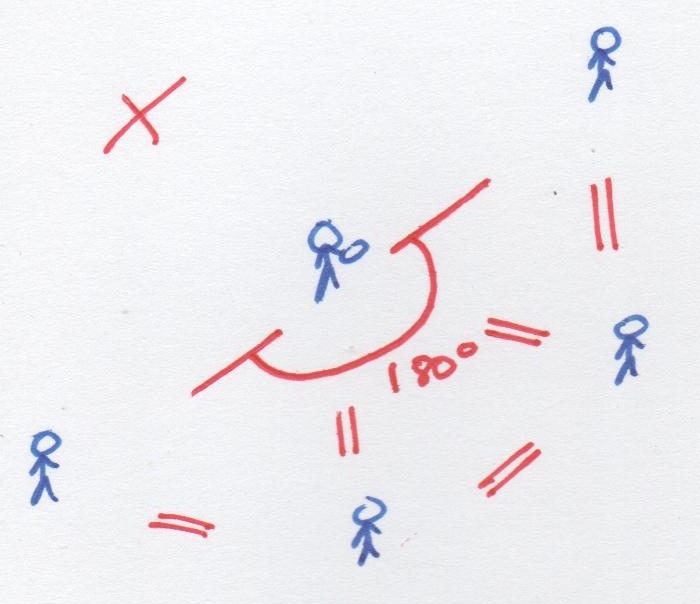
5v5 – 7v7: Don’t surround the disc – all players should be within the field of vision of the thrower – so only 3 players should be connected to the thrower.
 The remaining players should not set up connected to the disc, but should get connected to non-throwing players to make further triangles.
If too many players try to get connected to the thrower, the thrower becomes crowded and / or surrounded by defenders.
There are a number of drills which practice key elements of Hex offence. If players have had a go at Hex then they should be able to relate to the following drills / exercises:
Give-Go-Swill Drill
7-12 players
Focuses: Give-Go moves, Misdirection
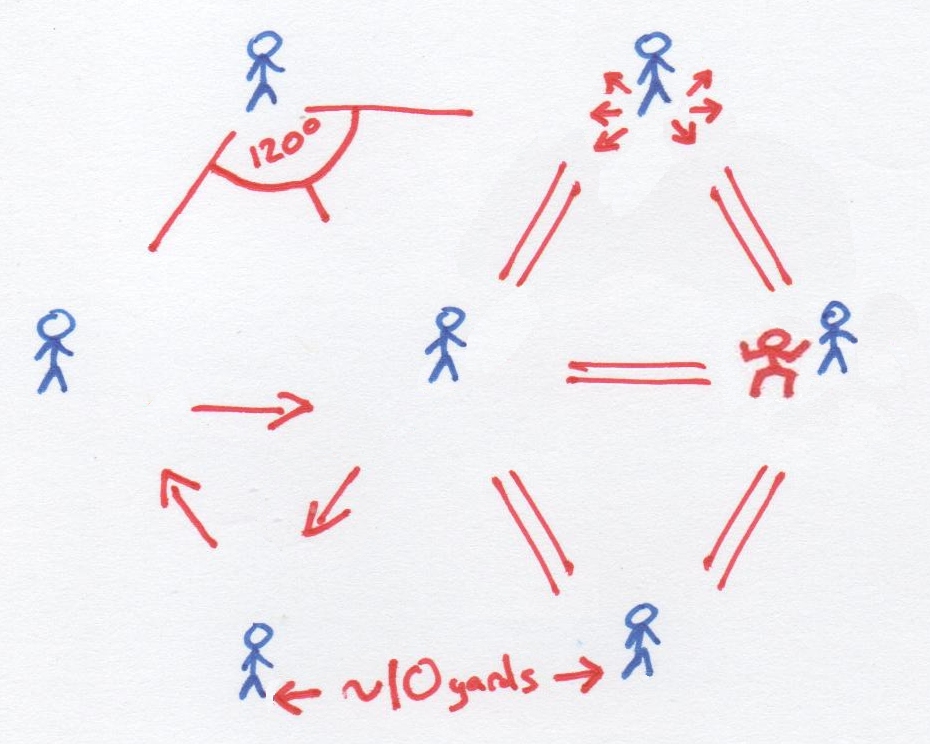
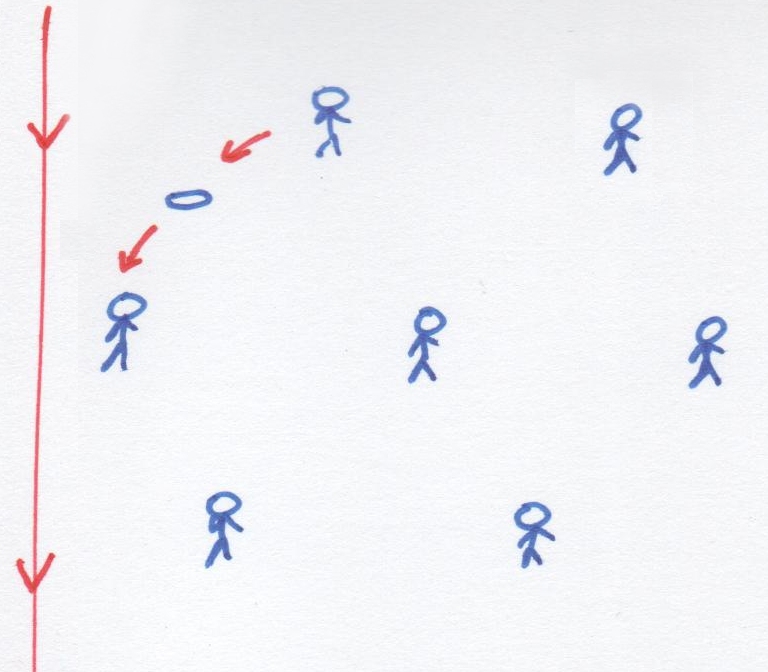
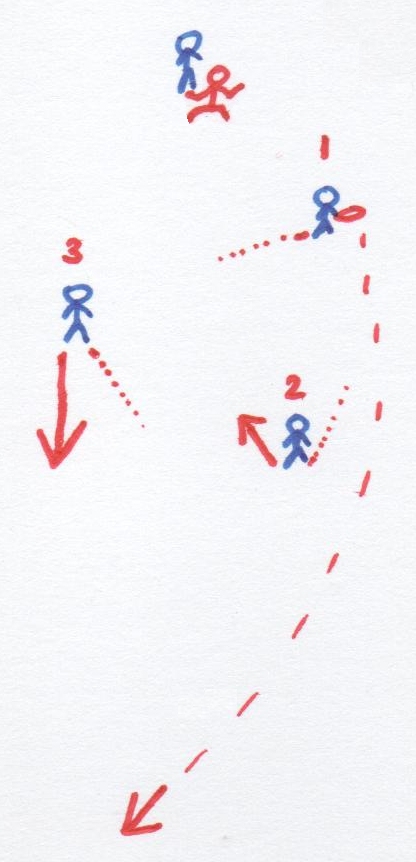
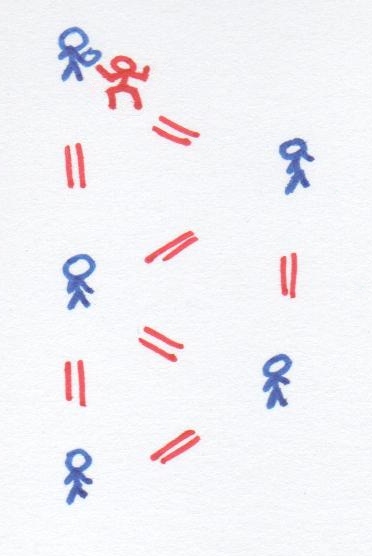 Players start as illustrated in the diagram on the left. The player at the top is the active ‘O’ player, accompanied by a defender – all other players are static. The active ‘O’ player is aiming to work the disc down to the player at the end of the drill, using at least one static player from the far side.
 The offence is not allowed to throw to a player they are not connected to, and static players may not pass to each other.
The defender is simply trying to stop the offensive player, by containing them / going for an interception / getting a point block. When the disc reaches the furthest player, they throw a long pass back to the start, swilly enough for both the O and the D to be able to make a bid for.
 The give-go-swill drill trains misdirection, balance, and using flow and tempo to attack. Players should find that it is more effective to advance the disc through give-go moves – including moves away from the end target – than it is to directly break the force from static. Players also learn to communicate clearly with the static players about when/where they want the disc thrown back to them.
Rotation: The long thrower at the end joins the queue at the top, all the static players zig-zag down one position, the O becomes the first static player, and the defender becomes the active O player.
J-Lav running through the Give-Go-Swill drill at GB Mixed U23 2015 training
Mex Puzzle Drill
6-13 players
Focuses: Communication, Creating space
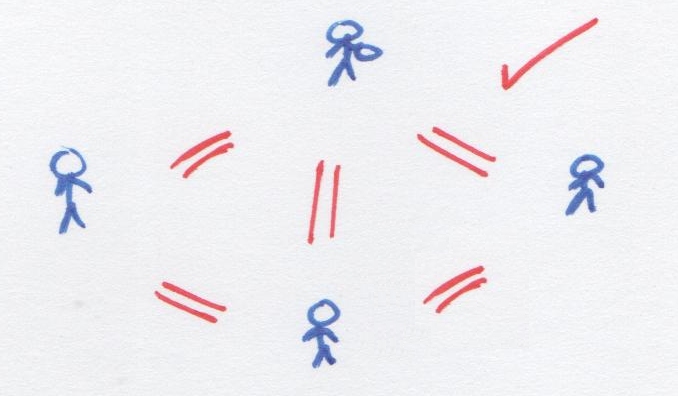
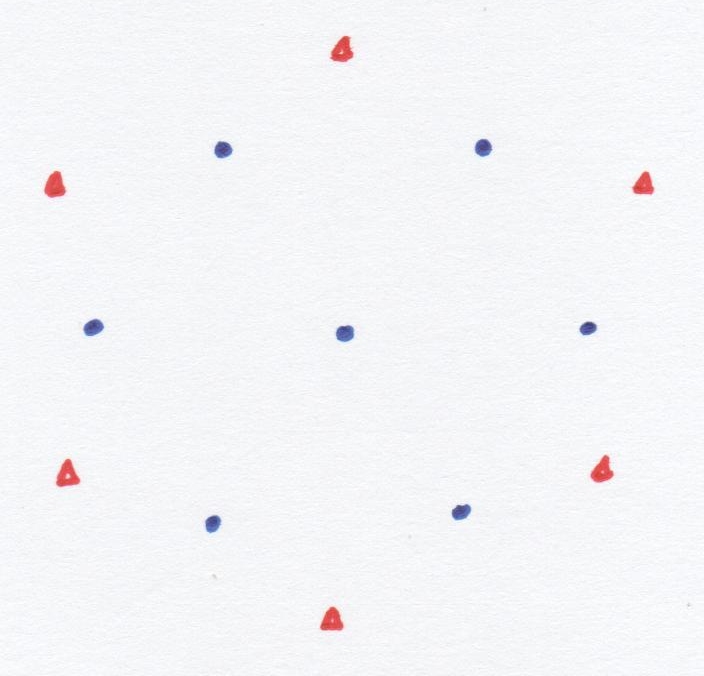 Set up 7 marker cones in a regular Hex formation, and add six ‘clearing cones’ around the outside, between the marker cones and further out from the centre. Players can cut to marker or clearing cones at any point and from anywhere in the formation, and they are allowed to hang out on the marker cones – but must continue moving if they are near a clearing cone. Passes should be made from marker cone to marker cone, hitting receivers in stride. The pass should be faked if a receiver arrives too early at a marker cone, if there are two cuts to the same cone, or if the thrower is not happy with making the pass for any other reason.
The disc starts on the edge of the formation, one player cuts to a clearing cone to create space for the first pass, and play continues for 30-60 seconds depending on your team. Players aim to keep flow by creating space for each other & keeping the disc moving. Fakes help the team keep tempo.
Mex Puzzle Drill is probably the hardest drill in the world which doesn’t involve defenders, and as such it can be frustrating – but it is great for teaching dynamic spatial awareness. Players constantly have their heads up, are looking to create space for each other and use it as they see it developing – a very valuable skill which is tricky to learn and tricky to teach.
In order to keep any kind of flow or tempo, the team must also learn to communicate constantly through vocalisation and gesticulation. This teaches them to work together as a team when playing offence, with everybody sharing the responsibility for keeping the disc alive.
Rotation: Mex Puzzle Drill can be very tiring, so regular breaks / multiple subs are recommended. Rolling subs can be waiting to be tagged in near the clearing cones, or the drill can be played in short bursts (although ideally the offence works at a rate they can sustain indefinitely).
Mex Puzzle Drill at Brighton City trials, 2015
Mex Huck Drill
8-13 players
Focus: Long throwing from motion, Breaking the force
 Players set up in a rhombus, first cut goes from the open to the break side, the other cutters follow the triangle rotation – break side player goes deep, deep/forward player comes under to the open side. If the break pass is thrown, the under cutter turns to go deep, and the deep cutter turns to come under.
 Catcher of the break pass throws long to the new deep cutter.
If the break pass is not thrown, cutters should improvise to provide a suitable backup option for the thrower – often the initial deep cutter is well placed / has good timing to come under for an open-side under pass, and then throw deep to the original break-side cutter.
If you want to expand on the Mex Huck Drill, consider adding defenders whilst also giving the cutters more freedom to choose the direction of rotation of the triangle. You can also change which cutter initiates the movement downfield – these modifications prevent players from simply ‘running through the motions’ – instead they should start with their hips facing the thrower, being ready to react to space as they see it being created. The setup/shape can also be rotated to create different angles – meaning the long thrower could receive the first pass moving towards as opposed to away from the end zone, or the disc movement could be changed to be lateral (a swinging drill) instead of downfield.
Rotation: New player becomes force, force becomes break-thrower, break-thrower becomes long thrower (starts open side), long thrower becomes deep-to-under cutter (starts deep), deep-to-under cutter becomes under-to-deep cutter (starts break side), under-to-deep cutter joins the queue.
| Mex Huck Drill at City trials 2015 | Variation – using open side if no break |
Flags
2-7 players
Focus: Identifying space, throwing skill
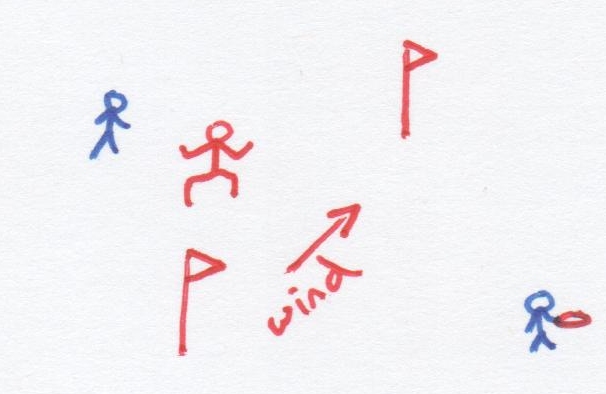 Flags is a simple game which adds training elements to a throw around. It will expose your weaknesses and challenge your strengths. Set out two flags (markers – water bottles are good) a few yards apart, one directly downwind of the other – these mark the goal line – the windier it is, the longer the goal line should be. The higher the skill of the players (and/or the lesser the wind), the narrower the goal line.
2 players: Throw from where you catch, don’t cut for throws but do move to catch them. (1) Throw over the goal line at any height, (2) Throw around the far side of the goal [OI], (3) Throw around the inside of the goal [IO]
3 players: 2v1 – Rolling defender, off-disc movement now encouraged. All players can move freely and pass on either side of the flags, but only passes across the goal line (at any height) count as goals. Goals reset a shot clock (7 seconds) – the shot clock can be counted by the defender from anywhere on the field, and if it runs out then it’s a turnover.
Experiment with different goal sizes, goal orientation to the wind, restricting the surrounding space with back lines, and so on. I recommend stalling from 3-10, as this is most game-like – mimicking the common situation where a thrower looks for a secondary option at stall 3.
Let me know if you come up with some interesting exercises, drills, games, or ultimate rule-modifications yourself! As it was written on the first frisbee – Play catch. Invent games. Have fun.
If you have any questions, just get in touch.
For videos of full games with Hexagon offence, check out the Hexagon Ultimate YouTube and Facebook pages.
Related:
Hexagon Ultimate YouTube
Hexagon Ultimate Facebook
Reddit discussion on (an old version of) this article
Clap catching:
Most people have a preferred way of clap catching – practice the other way until you are comfortable with both
Touch Throwing:
Practice adding touch by pulling your arm back as you release your throws
Focus
Once you’re out and throwing around regularly, the second step is to give yourself purpose – are you trying to throw & catch with perfect technique, or are you pushing your limits / experimenting with variety? Are you still weaker catching with your non-dominant hand? Can you clap catch equally well with either hand on top of the disc?
Start every fake or throw from the power stance / neutral stance
The power stance is where you stand with feet slightly wider than shoulder width apart, knees slightly bent, disc held flat at your waist, with hands at 11 and 1’o’clock, and all fingers on both hands tucked under the rim. This means you are already coiled to throw quick lefty or righty backhands, and ready to pivot / set up your body for regular backhands / flicks / hammers / off-hand backhands in a balanced manner.
By training to throw every throw from the power stance, and conditioning yourself to get into the power stance whenever you catch the disc in a game, you are normalising game situations (bringing them as close to throw-around situations) as much as possible whilst also maximising your options on the field.
Finish throws in a balanced stance
After releasing the disc, hold your final stance for three seconds, to emphasise balance. If you are releasing the disc from a balanced position then your consistency and ability to adapt or turn the throw into a fake goes way up. Make sure you can perform every type of throw finishing in a balanced position. Once you’ve got the hang of this, practice doing the opposite – practice pushing off and running as soon & as fast as you can after each release.
Throwing motion technique
4 consecutive stages to work on, whether you’re a beginner or experienced – it’s always worth revisiting these stages one by one:
Technique for a fake should be identical to technique for a throw, as the realism is directly related to how effective the fake is on the field.
The “perfect” area to aim for on your receiver is the neck – this is the mid-way point between the ground and the extent of their reach when they jump, so this is the point which has the highest margin for error, therefore the safest throw.
Reduce baggage
From your power stance to the furthest back point of your wind-up, the disc should be taking the most direct path, without changing orientation or hesitating at any point. If you rotate the disc on any axis not perpendicular to the ground during your wind-up, hesitate with your flick cocked back, move the disc up and down, hold your backhand far away from your body whilst winding up, or do anything else unnecessary with the disc or your body, you have “baggage” on your throw and you should be working to get rid of it to maximise the efficiency of your throwing technique.

Another variable which affects the way to clap catch is the angle of the disc. Position your body so the disc will be coming straight towards you (rather than slicing across), and if the disc is tilting to the left, catch left hand on top – if tilting right, catch right hand on top. This avoids you having to twist your arms and wrists awkwardly. Aim for perfection – have both hands contacting the disc at the exact same time, in the centre of the disc, without changing the angle the disc was flying at.
Crab catch with two hands:
Crab catching is the quickest way to catch, so is critical in any pressure situations. If the disc is still above face height when you are at the top of your jump, crab catch with thumbs under the disc. If it is still below hip height when you crouch, crab catch with thumbs on top of the disc.
To make your crab catches safer and easier, align your shoulders with the angle of the disc. For example if a slightly bladey righty hammer comes in high (tilting to the left), you want to rotate at your core so your left shoulder is lower than your right, thus both arms can be at full symmetrical extension with no extra wrist/shoulder rotation needed when you catch. Where possible, get your eyes on the same plane & tilt as the disc too.
Overcompensation
This is far and away the best & fastest way to improve your throwing and catching on your own accord. If you tend to do something one way, or if a throw goes wrong in a particular way, overcompensate and make sure you do it to the opposite extreme – do it wrong the other way – and you will quickly find the middle ground. If it goes wrong three times in the same way, get it wrong three times in the opposite way before continuing – try to even out your errors to 50% either way.
The rule of overcompensation applies to pretty much everything, from specific details (if your throws often go outside-in, try extreme inside-out angled throws), to wide-ranging statements (if you don’t clap catch enough, try to clap catch too much – where a crab catch would be appropriate). A list of throwing/catching modifications to experiment with, and ways in which to overcompensate, can be found at the end of this article.
“In the zone” catches
Athletes are able to pull off seemingly impossible moves because they plan and visualise them before they execute them, and then make minor adjustments to their plan dynamically whilst executing them – simplifying the whole process, which has the effect of making it seem like reality is happening in slow-motion in their minds. It’s called being ‘in the zone’ and it’s a fantastic feeling. Here’s how to do it:
As soon as the disc is thrown, read it and make a detailed plan for the catch. Decide (a) exactly how you are going to catch it – what angle it will be at, what type of catch you are going to execute, where on the disc your contact will be, and even what parts of your hands are going to touch it first, (b) exactly where you are going to catch it – are you going as high/early as possible, as safe as possible (chest behind clap catch), as early / late as possible, or something else – this changes how you approach it. Plan out each step you are going to take before the catch and begin to execute that plan immediately.
In the second after the disc is thrown, you will get a better read, and will have to make modifications to your plan – make these changes as early as possible, so that they can be as slight as possible, and the overall plan becomes clearer as it doesn’t have to change very much. These modifications continue right up until the catch, and get smaller and smaller. A benefit of knowing what the ‘ideal’ technique is that you won’t need to abandon your plan if it goes slightly wrong – you’ll just need to make a modification (unless something unexpected happens). By the time your hands contact the disc, you will have subconsciously prepared so well that the catch will look easy.
Throwing for distance
For distance, you either need more inside-out angle on your technique, or you need more power on your throw. If your ‘long’ throws are turning outside-in, change your technique to release the disc more inside-out, focusing on spin, aiming to get the disc landing at an inside-out angle. When your long throws begin landing inside-out, you can then focus on adding power to the throw – until they are turning outside-in again. Add power by dropping your shoulder, rotating your core, and ‘snapping’ your core (rotationally) as powerfully as you can. Repeat this two-stage process indefinitely to increase the distance of your throws.
Expand your range and variety
Push your limits in every way you can think of – for every limit you can think of, there is an overcompensation limit you can also push, and it will all help you be a well-rounded and versatile thrower & catcher. I’ve listed some below (print & take to your throw-around), however this is by no means an exhaustive list and I recommend you come up with your own!
Catching:
As high as possible | As low as possible
RH on top clap | LH on top clap
Clap | Crab
Close to body | Far from body
Early catch | Safe catch
Early move | Late move
Positioning for jump | for chest-high clap | for ankle-high catch
“Correct” catching | “Incorrect” catching
Zero preparation | Excess preparation
Early static positioning | Three-step-approach jump
Three-step-approach jump: Towards disc | Perpendicular to | In the direction the disc is travelling
General:
Work on weaknesses | Work on strengths
Totally sober | Not sober
Exerting maximum energy | Exerting minimum energy
Max number of discs – quick thinking | One disc aiming for perfection – pressure
If you prefer more structure to your throw-around sessions, you can print & follow the “Throwing for Greatness” doc copied below, created by Megan Hurst & Felix Shardlow around 2013:
1. FOCUS on: Release points
Your completion rate should drop in this section – it’s about pushing yourself past your limits. Throws are meant to feel awkward. View this as good catching practice as well!
10 sidearms, 10 backhands released…
– as low as you can
– as far away from your body as you can
– as high as you can
2. FOCUS on: Catching the frisbee-disc
Awkward 40s:
10x sidearms to off-hand catches
10x backhands to off-hand catches
10x roll-curves to awkward (but correct) clapcatches
Jump ball – standing slightly less than your hucking distance apart, throw long, high discs to each other. Throw roll-curve and IO, practice attacking these and catching at the peak of your jump, or on your way down.
It’s better to have a few go over your head before you catch one correctly, than to constantly catch them safely. Read the disc early, plan your approach, jump to your max.
20x catch attempts (discount poor throws)
3. FOCUS on: Faking before throwing
Fake on opposite side before each throw. Make sure your fakes are believable – sharp snap of the wrist on fake, wide pivot and low as possible for both, try to remain balanced.
20x sidearms, 20x backhands.
Stretch to warm down afterwards.
If you’re pushed for time, chop out one of the sections, but make sure you don’t always chop the same one.
Optional extras: pulling practice, hucking practice. If you want to huck or pull in games you will need to practice it between trainings. For these bigger throws, make sure you warm up your arms a little more beforehand.
First published 1st Jan 2013
v 2.1 – 15/7/14
Also available in French / en Français
NB: This documentation is now out of date – please see the links from the menu for the most up-to-date version
“Hex Offence” covers any offence which plays to the hexagon shape on the field as described in the “Formation” section below. Currently there is only one known offence which utilises this shape – Mexican Offence, or Mex for short – which is a flow-based offence operating on principles (as opposed to e.g. patterns). This article describes Mex Offence.
Introduction
This document explains the basics of Hexagon Offence in Ultimate. Hex was first played in the summer of 2012 in a pickup game in Brighton, introduced by Felix Shardlow. The strategy quickly gained support and became the favourite amongst many players, who recognised its potential and enjoyed its freedom. These players would each feed ideas back and forth, discovering new ways to unlock its potential, and figuring out the most effective principles which should be applied. A history of how it stood up to tests in it’s early days is at the bottom of this page.
This offence can be played effectively in high level Ultimate, or be the first offence taught to beginners – who will quickly pick up on the fundamentals of the game with a style that encourages involvement and offers constant opportunities to contribute to plays.
Hex can also be played with fewer players – although the overall shape changes, the principles remain the same and the effectiveness is not compromised.
This doc is written so a beginner can pick it up and understand how to play offence in Ultimate without any prior experience. Experienced players may have picked up habits and principles from other offences which can hinder Hex, so clear your mind and try not to make any assumptions. The information in this document is very basic – deliberately open to the interpretation that best suits your team.
Principles
On-disc:
Off-disc:

Formation
Firstly, this formation is not a structure which must be strictly followed at all times – it is a guideline for the shape the players should be looking to maintain during fluid play, or the areas which players should be aiming to move towards / to clear for team mates – a meta-structure, if you will, to keep in the back of your minds whilst the offence moves fluidly. Players could either be taking the initiative and moving into / clearing space at all times, sticking more rigidly to positions, or running set plays – this depends on the style of your team.
The disc should be on the edge of the formation – this prevents surrounding the disc, and gives continuation options after the first pass is made. The shape extends from the disc towards the centre of the space available – so when the disc is on the sideline, the formation extends directly off the line into the centre of the field. This animation shows how the shape is applied when the disc is in different field positions – essential viewing.
The shape consists of six equilateral triangles creating a hexagon. The use of triangles means players are spread across the field in the most efficient manner – each player has as much space as possible, whilst remaining connected to as many team mates as possible. Maintaining these triangles and thus the ‘connections’ between players is crucial to the effectiveness of the formation – if disconnected, flow will stutter and may stop.
The distance between each player should be equal distance to the average player’s comfortable, reliable, and accurate throwing distance – usually between 5 and 15 yards. The triangles are the crux of the shape so must not be neglected – the overall formation acts as a guideline for the space we should be looking to use during fluid play.

Movement
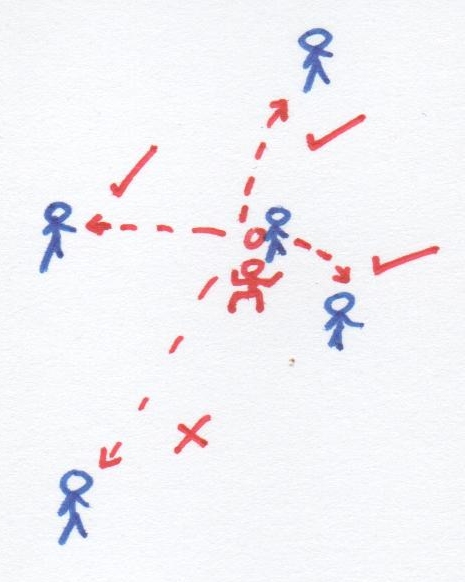
How the movement from the Hex setup works is largely down to how your team wants to play. Expansive moves create space which can immediately be used by the surrounding players, so can be used to initiate play. Moving rapidly to the end zone is possible from many positions on the field, and the space directly around the disc is always available to be used. Give and go moves work well, and set plays are possible in every situation – three players cutting in a triangle shape, for instance, presents three viable options every couple of seconds.
For efficient movement when the disc is in flow, a few rules of thumb can help. If the disc is flowing up the sideline, the formation should ‘roll’ up that sideline – players behind the disc should push out wide away from the disc and then fast downfield, and players in front of the disc should attack the space in front of the disc on the active sideline – as per this animation.
If the disc is passed to the central player, players behind the disc (surrounding it) should push wide and downfield immediately, and players downfield should look to move into the space created in the centre, in front of the disc. This animation shows movement after a simple pass to the central player, and this animation shows movement when the central player receives the disc towards the side of the field.
Scoring
Scoring usually happens in one of two ways: (1) from a deep throw, or (2) from flow towards the end zone.
Static, stop-start situations near to the opposing teams end zone are difficult due to the defenders having a very small space to cover – the deep throw is no longer a viable threat.
When a comfortable distance away from the end zone, deep throws are possible from many positions, and rapid moves to the end zone are able to come from almost any player at any time.
Flow towards the end zone can be started by flowing with the disc in any direction, moving the defenders out of position, and then taking advantage of the space to generate a scoring opportunity. If flow stops without a score being generated, then the team should focus on re-starting the flow – either by moving the disc across the field, or – more easily when very near the end zone – by flowing back away from the end zone. After flow away from the end zone has been achieved, once again the deep throw will be a viable threat (assuming your team has retained their shape), as well as the possibility of re-generating flow towards the opposing teams end zone.
The ideal distance to which you should flow away from the end zone depends on the players on your team – far enough so that all defenders are out of the end zone, but not so far that your players cannot reach the end zone with a long throw.
History
The Hexagon Offence was created by Felix Shardlow in 2012 and the original content can be found here: http://goo.gl/miR1Jj. Felix had many influences in the 12 years he played Ultimate before writing up Hex, including strategic talks with Sam “Scando” Webber, reading content from Jim Parinella, but most notably with regard to Hex was Frank Huguenard, who would persistently post on forums about how antiquated current offensive thinking in Ultimate was, and relentlessly promote his Motion Offense.
Although Hex was experimented with occasionally by the Brighton City offence line through 2012-2013, it was only at UKU Tour 3 2013 where it blossomed. The Brighton City offence line decided to come straight out with it in their first game, against Euro Champions Clapham – who beat Brighton 15-8 at UKU Nationals 2012.
Clapham started out with man-to-man defence, but Brighton scored relatively easily with long throws. Clapham then threw a tight zone defence – but without modifying their offence, Brighton scored in a few passes. Clapham then put on a loose zone, and Brighton scored in 5 or 6 passes to make it 6-6.
Although Brighton’s D line hadn’t converted any turns, Clapham felt like they were on the ropes, called their second time-out, and came out with a very physical, tight man-to-man defence. They edged the game away, winning 15-11 in the end – the best result Brighton have had against them for years. After the game, Marc “Britney” Guilbert – Clapham and GB Open captain – said how impressed he was with the way we created and used the space on the field, that we were doing it in a way which Clapham aspired to.
Brighton City finished 3rd at UKU Nationals 2013 using this offence 90% of the time on both lines. However, the offence is not limited to top-level play. The principles at work in Hex are more similar to other sports than any other offence in Ultimate, and Hex has been easily and successfully taught to university freshers from both Sussex and Brighton Universities – new players who have only ever played Hex are already showing a great understanding of Ultimate and excelling in the Club scene.
In 2014, Brighton City’s play has become more ingrained – our movement within Hex requires less thinking and happens more naturally, and as such Hex was a big part of our taking Clapham’s D line to sudden death at Tour 2. Brighton continue to play the offence through the 2015 & 2016 seasons, finishing 3rd at UK Nationals 2015.
In 2015, the Great Britain U23 Mixed team played solely Hex at the World Championships in London. Beating Japan and runners-up Australia along the way, they finished a very respectable 5th.
Resources
Full game footage of Hexagon Offence being played is available here – see any of Brighton City’s games from UKU Nationals 2012/13/14, XEUCF 2013, EUCF 2014, or any Sussex Mohawks 1 or Brighton Panthers games from Uni Regionals 2014. For clips of Hexagon Offence see the Hexagon Ultimate YouTube channel – here are some samples from the channel of Hex in action, taken in 2013.
NB: The play in these videos is by no means a perfect display of Hex, and in the football ones I did get a bit overzealous on drawing triangles over the pitch…
(c) Felix Shardlow v.0.97 28/04/2015
Also available in French / en Français
Part of a series:
Flexagon Defence
Advanced Flex Part I: Counter-Strategies
Advanced Flex Part II: Communication
Advanced Flex Part III: The Stall 3 Game-Changer
Flexagon approaches defence from a new angle, bringing together elements of person-to-person defence and zonal defence. Flex is neither “man” nor “zone” – it’s a hybrid, with its own set of principles. In Ultimate, offence has the advantage, and gaining the upper hand on defence requires utilising a combination of athleticism, positioning, and teamwork. Person defence is weighted towards athleticism, zonal defence is weighted towards positioning, whilst Flexagon defence is weighted towards using teamwork to capitalise on any inefficient movement or positioning by the offence.
 Positions are highly flexible as they are largely dependant upon the position of the offensive players, however the underlying structure can be described as a 2-3-2.
The terms “forward” and “back” refer to how you see the field when on the line before a point – “forwards” are comparable to “handler marks”, “backs” are comparable to “deeps”.
Positions can and should switch during a possession – quite often it makes more sense for a defender to stick with their mark as they move across the field, rather than to switch – other defenders should adjust accordingly. A defender may start as a ‘back’, then transition into the ‘hat’ position, and end up as a ‘forward’. Abiding by the principles makes these dynamic positional switches possible.
If the offence sets up in a 3-4 formation, then the Flex will also resemble a 3-4 formation – more on this in Advanced Flex Part I: Counter-Strategies.
The force – if the disc is near the middle then force towards the middle, if the disc is near the sideline then force towards the line – this leaves defenders on either shoulder of the force in both situations. It’s not always a ‘forward’ player that puts the force on – when the disc is near the line, it’s likely that a ‘wing’ will put the force on – depending on the position of the other offensive and defensive players.
When offensive players are near to each other, they are inefficiently positioned, and the defence should look to punish this by surrounding (sandwiching) them – ensuring they are using the same number of defenders as there are offensive players. If the offensive players are spread out & utilising the space on the field, the defence is best positioned tighter to the players, and should not attempt to sandwich.
When offensive players move towards each other, or towards defenders, they are moving inefficiently, and the defence should look to punish by switching their marks. This conserves energy, and creates an opportunity for a block as the defence is approaching from an unexpected angle. If the offensive players are moving to space, then the defenders should not attempt to switch marks.
Advanced Flex Part I: Counter-Strategies
Advanced Flex Part II: Communication
Advanced Flex Part III: The Stall 3 Game-Changer
Want videos of Flex in action, or vocal explanations and stuff? Keep updated through the Hexagon Ultimate YouTube channel.
Flex in action against FWD at Europeans – fast forward to 37:48:
Recent Comments